零:环境配置
在开始之前,我们需要先准备好 mirai 的环境。如果你已经配置好了 mirai-api-http,可以跳过这一节。
1. 安装 mirai-console
我们推荐使用 iTXTech 提供的 mcl-installer。
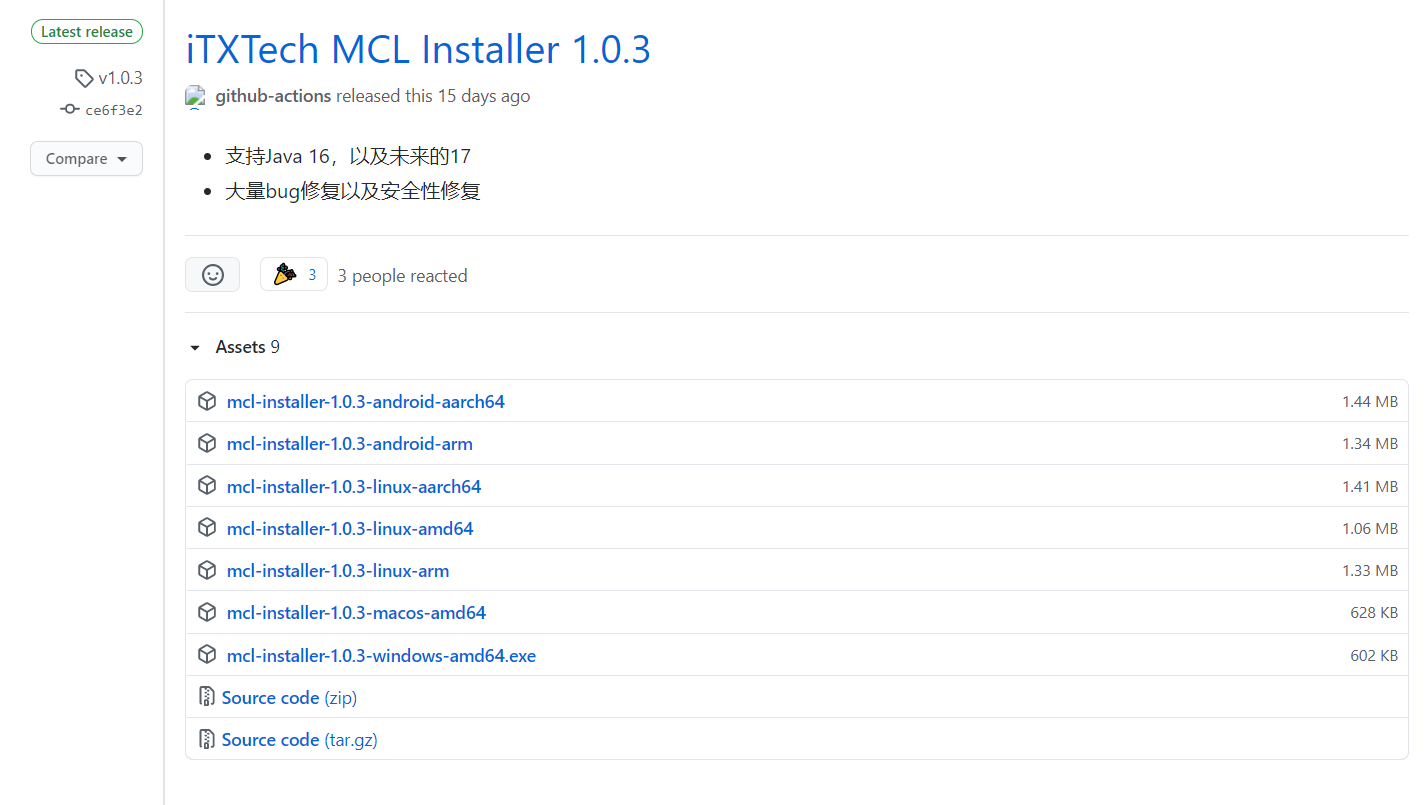
在 releases 页面下载对应版本的安装包。

不知道该选择哪一个?
一般来说,Windows 系统请选择 mcl-installer-X.X.X-windows-amd64.exe,Linux 系统请选择 mcl-installer-X.X.X-linux-amd64,MacOS 系统请选择 mcl-installer-X.X.X-macos-amd64。
当然,如果你需要在特殊指令架构的系统上安装,也可以选择对应的安装包,或者直接下载源码进行编译安装。
之后,将安装包放置在你想要安装 mirai-console 的目录,在命令行中运行。
选择合适的目录
因为 mcl-installer 会把 mirai-console 安装到命令行当前目录,所以请不要在“下载”目录等类似的地方运行。
事后清理很麻烦,真的。
接下来你会看到这样的输出:
$ ./mcl-installer-1.0.3-windows-amd64.exe
iTXTech MCL Installer 1.0.3 [OS: windows]
Licensed under GNU AGPLv3.
https://github.com/iTXTech/mcl-installer

iTXTech MCL and Java will be downloaded to "D:\mirai\"

Checking existing Java installation.
Error occurred while checking Java installation

Would you like to install Java? (Y/N, default: Y)
Java version (8-17, default: 11):
JRE or JDK (1: JRE, 2: JDK, default: JRE):
Binary Architecture (default: x64):
Fetching file list for jre version 11 on x64
Start Downloading: https://mirrors.tuna.tsinghua.edu.cn/AdoptOpenJDK/11/jre/x64/windows/OpenJDK11U-jre_x64_windows_hotspot_11.0.11_9.zip
Downloading: 42522345/42522345
Extracting [401/401] jdk-11.0.11+9-jre/releaseappingsage.txtuffix_list.datINFOFOINFOFOPTION_INFOION_INFO
Testing Java Executable: D:\mirai\java\bin\java.exe
openjdk version "11.0.11" 2021-04-20
OpenJDK Runtime Environment AdoptOpenJDK-11.0.11+9 (build 11.0.11+9)
OpenJDK 64-Bit Server VM AdoptOpenJDK-11.0.11+9 (build 11.0.11+9, mixed mode)

Fetching iTXTech MCL Package Info from https://gitee.com/peratx/mirai-repo/raw/master/org/itxtech/mcl/package.json
Mirai Console Loader 公告栏

[mirai-console] 最近, 项目组发现了权限系统可能会被错误的提前加载导致的3rd权限系统无法正确加载

于是决定, 于 2.6 起, 超前访问权限系统将得到一个错误并中断插件加载, 请各开发者及时检查

影响范围: https://github.com/mamoe/mirai-console/pull/307


The latest stable version of iTXTech MCL is 1.2.2
Would you like to download it? (Y/N, default: Y)
Start Downloading: https://github.com/iTXTech/mirai-console-loader/releases/download/v1.2.2/mcl-1.2.2.zip
Downloading: 1569577/1569577
Extracting [14/14] scripts/updater.jsjsjs
MCL startup script has been updated.
Use ".\mcl" to start MCL.

Press Enter to exit.
中间会有一些可以选择确认的提示,可以看一看,修改为自己需要的配置,或者一路回车下来也没有问题。
命令行输入 ./mcl 启动 mirai-console-loader。
首次启动时,自动下载 mirai-core 和 mirai-console,会看到这样的输出:
$ ./mcl
 21:48:11 [INFO] iTXTech Mirai Console Loader version 1.2.2-60c67fb
 21:48:11 [INFO] https://github.com/iTXTech/mirai-console-loader
 21:48:11 [INFO] This program is licensed under GNU AGPL v3
 21:48:11 [INFO] MCL Addon is installed! Website: https://github.com/iTXTech/mcl-addon
 21:48:11 [WARN] To remove MCL Addon, run "./mcl --disable-script addon" and "./mcl --remove-package org.itxtech:mcl-addon --delete"
 21:48:12 [INFO] Fetching Mirai Console Loader Announcement...
 21:48:12 [INFO] Mirai Console Loader Announcement:
Mirai Console Loader 公告栏

[mirai-console] 最近, 项目组发现了权限系统可能会被错误的提前加载导致的3rd权限系统无法正确加载

于是决定, 于 2.6 起, 超前访问权限系统将得到一个错误并中断插件加载, 请各开发者及时检查

影响范围: https://github.com/mamoe/mirai-console/pull/307


 21:48:12 [INFO] Verifying "net.mamoe:mirai-console" v
 21:48:12 [ERROR] "net.mamoe:mirai-console" is corrupted.
 Downloading mirai-console-2.7-M2.jar [==============================] 3.34 MB
 Downloading mirai-console-2.7-M2.sha1 [==============================] 40 B
 21:48:16 [INFO] Verifying "net.mamoe:mirai-console-terminal" v
 21:48:17 [ERROR] "net.mamoe:mirai-console-terminal" is corrupted.
 Downloading mirai-console-terminal-2.7-M2.jar [==============================] 1.24 MB
 Downloading mirai-console-terminal-2.7-M2.sha1 [==============================] 40 B
 21:48:18 [INFO] Verifying "net.mamoe:mirai-core-all" v
 21:48:18 [ERROR] "net.mamoe:mirai-core-all" is corrupted.
 Downloading mirai-core-all-2.7-M2.jar [==============================] 34.46 MB
 Downloading mirai-core-all-2.7-M2.sha1 [==============================] 40 B
 21:48:40 [INFO] Verifying "org.itxtech:mcl-addon" v
 21:48:40 [ERROR] "org.itxtech:mcl-addon" is corrupted.
 Downloading mcl-addon-1.2.2.jar [==============================] 19.97 KB
 Downloading mcl-addon-1.2.2.sha1 [==============================] 40 B
2021-08-03 21:48:42 I/main: Starting mirai-console...
2021-08-03 21:48:42 I/main: Backend: version 2.7-M2, built on 2021-07-06 21:43:31.
2021-08-03 21:48:42 I/main: Frontend Terminal: version 2.7-M2, provided by Mamoe Technologies
2021-08-03 21:48:42 I/main: Welcome to visit https://mirai.mamoe.net/
2021-08-03 21:48:42 I/plugin: Successfully loaded plugin MCL Addon
2021-08-03 21:48:43 I/main: Prepared built-in commands: autoLogin, help, login, permission, status, stop
2021-08-03 21:48:43 I/MCL Addon: iTXTech MCL Version: 1.2.2-60c67fb
2021-08-03 21:48:43 I/main: 1 plugin(s) enabled.
2021-08-03 21:48:43 I/main: mirai-console started successfully.
输入 exit 回车退出 mirai-console。
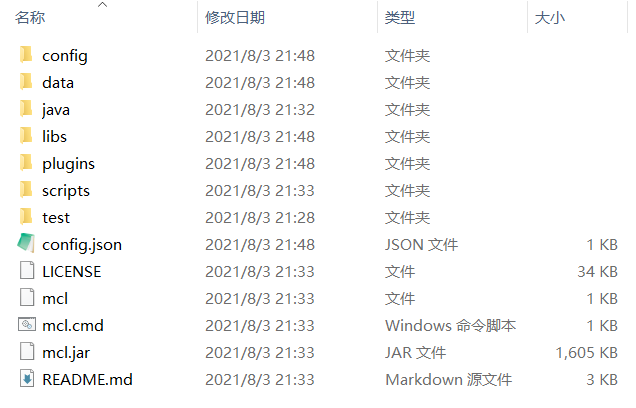
现在在文件夹中可以看到这些文件:

这说明,mirai-console 安装成功了。
之后,在这个文件夹里打开命令行,输入 ./mcl 就可以启动 mirai-console。
2. 安装 mirai-api-http
目前,mirai-api-http 可以通过 mirai-console-loader 安装或手动安装,两种方式择一即可。
使用 mirai-console-loader 安装
在 mirai-console-loader 的文件夹中,运行
./mcl --update-package net.mamoe:mirai-api-http --channel stable-v2 --type plugin
然后,在下一次启动 mirai-console 的时候,会自动下载并安装 mirai-api-http。
注意,上述命令中的 --channel stable-v2 是必须的,因为 YiriMirai 依赖于 mirai-api-http v2,而缺失此参数时,默认安装的是 v1,会导致无法正常使用。
手动安装
YiriMirai 依赖于 mirai-api-http V2,而 mirai-api-http V2 曾经在很长一段时间内并不能通过 mirai-console-loader 自动安装(原因),需要手动下载安装。
在 mirai-api-http 的 releases 页面 下载最新的 release 版本。目前,YiriMirai 支持的版本为 mirai-api-http V2.2.0。
将下载的 jar 文件放入 mirai-console 目录下的 plugins 文件夹中,然后重启 mirai-console。
3. 配置 mirai-api-http
启动 mirai-console,可以看到控制台输出多了下面几行:
2021-08-03 22:02:08 W/net.mamoe.mirai-api-http: USING INITIAL KEY, please edit the key
2021-08-03 22:02:08 I/Mirai HTTP API: ********************************************************
2021-08-03 22:02:08 I/http adapter: >>> [http adapter] is listening at http://localhost:8080
2021-08-03 22:02:08 I/Mirai HTTP API: Http api server is running with verifyKey: INITKEYn7ussdck
2021-08-03 22:02:08 I/Mirai HTTP API: adaptors: [http]
2021-08-03 22:02:08 I/Mirai HTTP API: ********************************************************
这说明 mirai-api-http 安装成功了。
退出 mirai-console,在 config/net.mamoe.mirai-api-http 文件夹中找到 setting.yml,这是 mirai-api-http 的配置文件。
将这个文件的内容修改为:
adapters:
  - ws
debug: true
enableVerify: true
verifyKey: yirimirai
singleMode: false
cacheSize: 4096
adapterSettings:
  ws:
    host: localhost
    port: 8080
    reservedSyncId: -1
重启 mirai-console,看到这样的输出:
2021-08-03 22:46:18 I/Mirai HTTP API: ********************************************************
2021-08-03 22:46:18 I/ws adapter: >>> [ws adapter] is listening at ws://localhost:8000
2021-08-03 22:46:18 I/Mirai HTTP API: Http api server is running with verifyKey: yirimirai
2021-08-03 22:46:18 I/Mirai HTTP API: adaptors: [ws]
2021-08-03 22:46:18 I/Mirai HTTP API: ********************************************************
恭喜你,mirai-api-http 安装成功了。
4. 登录 QQ
运行 mirai-console,在控制台输入 login QQ号 密码,登录 QQ。
设备锁
如果你的账号开启了设备锁,在 Windows 系统下会弹出这样的弹框:

这时点击图中的蓝色链接“设备锁验证”,会在浏览器中打开验证页面,完成验证即可。
如果在电脑上验证不成功,可以复制下面的 URL 框中的内容,在手机中打开,然后使用另一台已登录此 QQ 号的手机扫码验证,这种方法成功率较高。
此连接必须在手机 QQ 中打开,不能在电脑浏览器或手机其他浏览器中打开。需要使用另一台已登录此 QQ 号的手机扫码验证。
滑动验证码
有时候登陆账号还需要滑动验证码。这种情况可以使用 TxCaptchaHelper 处理。
在手机上安装 TxCaptchaHelper,打开后输入 mirai 给出的请求码,完成滑动验证即可。
备份设备文件
成功通过设备锁验证之后,在 bots/QQ号 文件夹中可以找到 device.json 文件,这个文件保存了此次登录的虚拟设备信息。
你可以备份这个文件,以后在其他地方使用 mirai 登录这个账号时,可以用备份的文件覆盖 device.json,这样可以避免设备锁验证。
到这里,运行 YiriMirai 需要的环境配置就全部完成了。